This page is also available in:  Deutsch (German)

The XML export of OTP tokens in Sophos Firewall is only possible for local users. Tokens of users from external authentication sources such as ActiveDirectory or LDAP are not included in the export. This guide shows you how to do it anyway.
Introduction
If you have to manually transfer configurations from one Sophos Firewall to another, you will notice small restrictions in this regard. For example, only the OTP tokens of users created locally in the firewall are included in the XML export. Why exactly this is excluded by Sophos here is not entirely clear to me. Especially as the tokens are included when restoring a complete backup.
When changing the firewall, most admins will take the backup route and are not affected by this. However, those who prefer to transfer selected configurations or switch from a 1U/2U model to a small desktop model will encounter this problem. The latter is still not supported by Sophos in every constellation at the current status and SFOS 21. However, I do not want to leave it unmentioned that since SFOS 20.0.2 at the latest, there should be a detour according to the compatibility matrix: 1US/1UL/2U –> virtual appliance –> XGS 88.
The method shown here is therefore not necessary in all cases! But it is always necessary with the manual method.
What is needed?
For the process you need:
- Shell access to the old firewall
- The storage master key of the old firewall for the import
- A little Shell experience
How does the solution approach work?
The approach I have developed is based on temporary changes to the users in the database. These changes are then completely reversed.
In general, the last authentication server used is stored in the database in the “authserverid” user field. The value “1” means “local database” of the firewall. Other IDs correspond to the IDs from the additionally configured authentication servers.
This ID is adjusted to “1” by a command. The firewall is therefore fooled into thinking that this is a local user. And this is exactly when the XML export of all OTP tokens works.
After successful export, the ID is reset to the previously set ID and the tokens can be imported to a new firewall. 😀
Please read all instructions and notes to the end to avoid problems or questions.
Implementation
Read out the necessary authentication server IDs
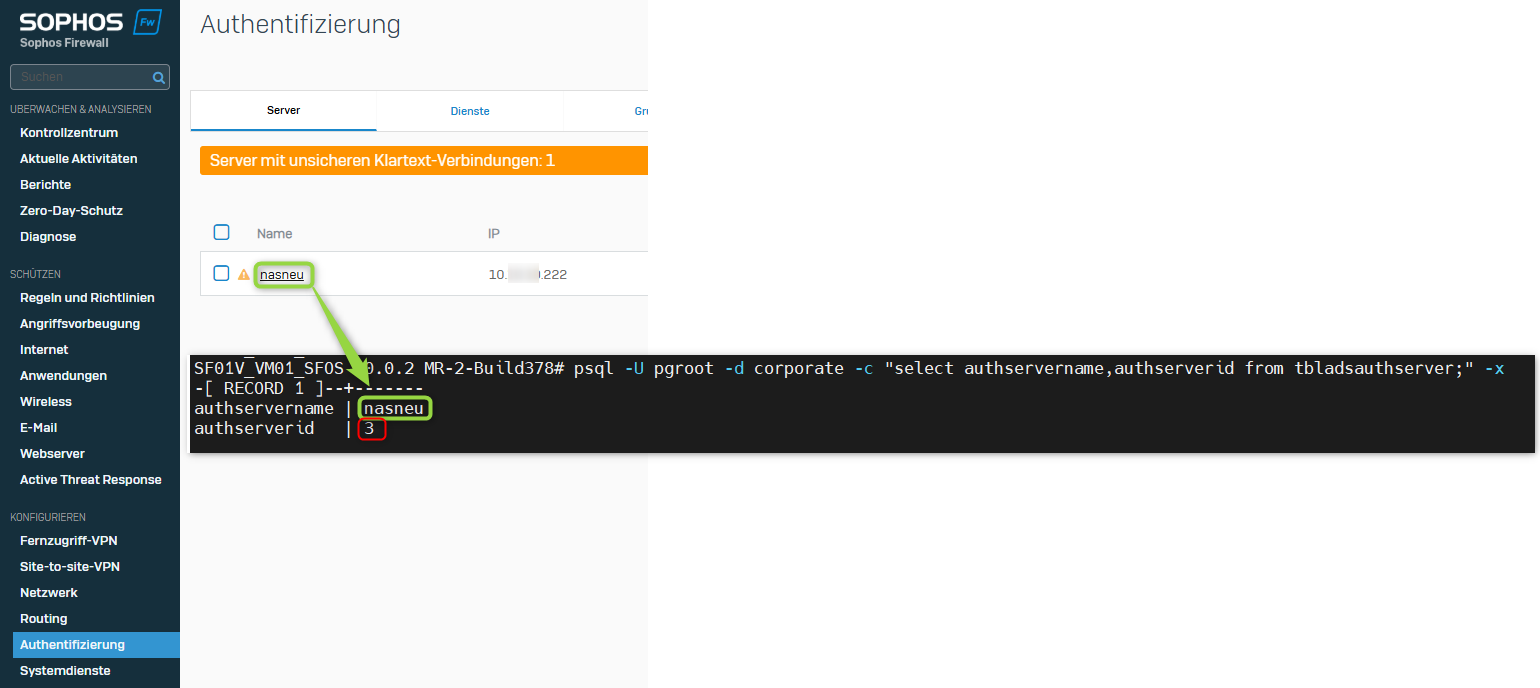
Log in to the advanced shell and enter the following command to display the IDs of the authentication servers.
Advanced Shell – Reading the authentication server IDs
psql -U pgroot -d corporate -c "select authservername,authserverid from tbladsauthserver;" -xThe output looks like the screenshot below. Depending on the number of servers, the list may be longer or contain only one entry, as in the screenshot. Make a note of the ID(s) for which the export is to be made. In most cases, this should be all those listed.
Set runtime variable
You now save the ID(s) in a runtime variable. This is required for the other commands.
Adjust the ID(s) in the following code window according to your ID(s). Resubmitting with different values will overwrite the value of the variable – in case you want to change the ID(s) again.
Advanced Shell – Set runtime variable for IDs
# Eine ID
# single ID
authserverids="3"

# Mehrere IDs
# Multiple IDs
authserverids="3,4,5"
List the tokens that can now be exported (optional)
If you want to list the tokens that can be exported afterwards, you have to enter this command in the shell. See it as a check of the IDs in the “authserverids” variable.
Advanced Shell – List of exportable tokens
if echo "$authserverids" | grep -q ','; then operator="IN (${authserverids})"; else operator="= $authserverids"; fi; psql -U pgroot -d corporate -c "SELECT o.tokenid, o.active, o.userid, u.username, o.comment FROM tblotp o INNER JOIN tbluser u ON o.userid = u.userid WHERE u.authserverid $operator;"The output then looks as follows. The “tokenid” is only displayed as a unique identifier. The other values are self-explanatory.

If the display is suitable for you, you can continue with the necessary adjustments.
Set ID on local server
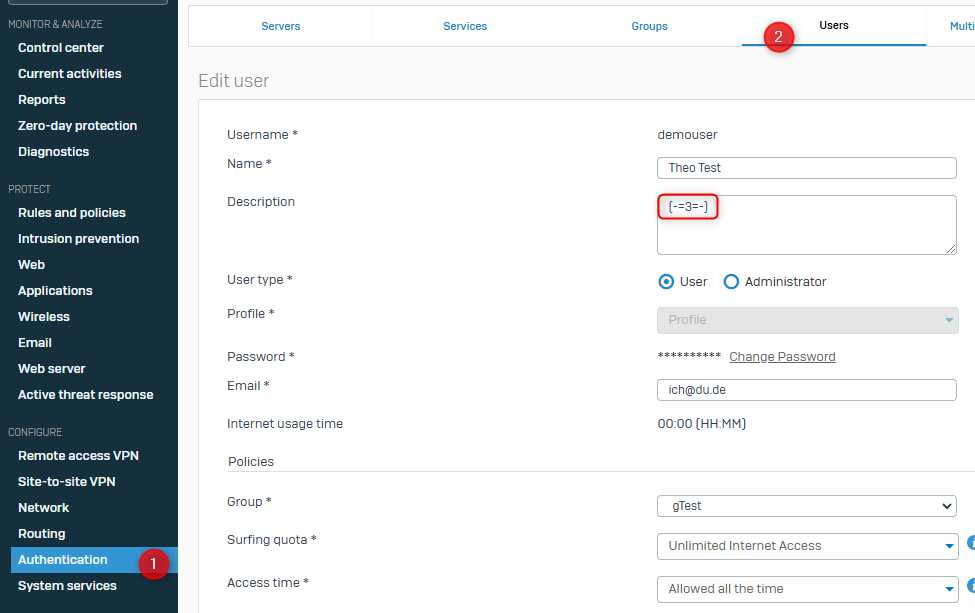
In the following, the authentication source of the users is changed to “local”. A “(-=ID=-)” is also added to the user description so that the entries can also be checked in the GUI. This value is also used to be able to undo the changes. “ID” is adjusted according to the last server ID set.
Advanced Shell – Set authentication server to local
IFS=','; for id in $authserverids; do echo "Processing authserverid: $id"; psql -U pgroot -d corporate -c "UPDATE tbluser SET authserverid = 1, description = CONCAT(COALESCE(description, ''), ' (-=$id=-)') WHERE authserverid = $id;"; doneIn the output you can see how many entries per ID have been adjusted – i.e. whether something has happened.

In WebAdmin, you can check which authentication server was previously set for the user. To do this, simply open the user. The value is in the description: (-=ID=-)
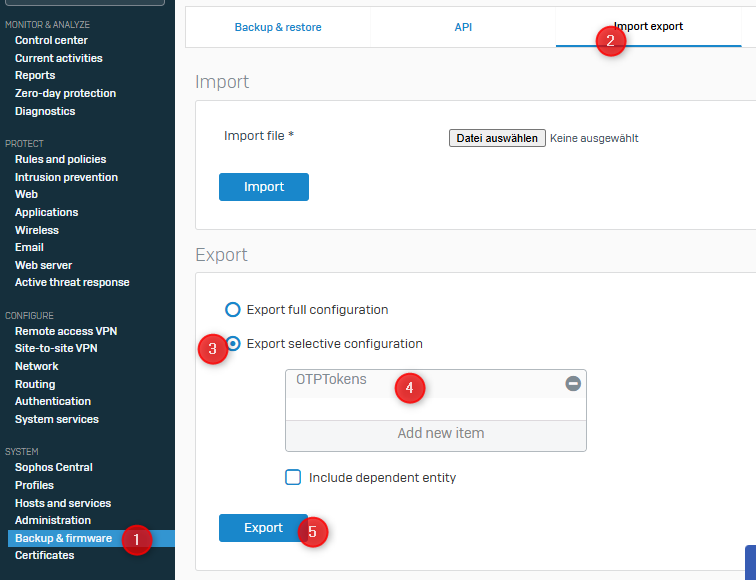
Export of the tokens
The OTP tokens can now be exported in the usual way.
Undoing changes to the database
The changes to the database can now be undone. The temporarily added “(-=ID=-)” is also removed again.
Advanced Shell – Reset ID for users
IFS=','; for id in $authserverids; do echo "Processing ID: $id"; psql -U pgroot -d corporate -c "UPDATE tbluser SET authserverid = $id, description = TRIM(REPLACE(description, ' (-=$id=-)', '')) WHERE description LIKE '%(-=$id=-)%';"; doneYou can now continue with the import of the tokens.
Please read on, as I also provide interesting and important information here.
Importing the tokens
The previously exported XML file can be imported into a new firewall. Please note the following information:
Tokens of the local database are also included
The export may contain more tokens than you would like. This is because not only the tokens matching the external authentication servers have been exported, but also those of the local database. If this is not desired, the XML file contained in the TAR file can be edited. To do this, simply remove all unwanted <OTPTokens>...</OTPTokens> blocks. To pack into the TAR file, please note the point“Pack edited XML back into TAR file“. Only the TAR file can be imported!
Import of tokens for (as yet) non-existent users
The tokens are assigned to a user name in the XML. If the user name does not exist before the import, the token is not imported. There are two possible solutions:
- Remove user assignment
In the XML, set the value<user>Benutzername</user>to an empty value<user></user>and assign the token later in the WebAdmin in the MFA configuration after the import. To pack into the TAR file, please note the point“Pack edited XML back into TAR file“. Only the TAR file can be imported! - Create the user beforehand
There is also a workaround here that works well without the user actually having to log in. Simply create a user locally in the firewall. Pay attention to the correct user name. Mail and display name will be corrected automatically later. Set a cryptic password for the user. This is no longer valid later. The token can be imported at this point and is assigned correctly.
If the user subsequently logs in via the external authentication server, the user is converted to an external user. The mail and display name are adjusted according to the source. The previously defined password is no longer valid from this point on.
Pack edited XML back into TAR file
When repacking the data into the TAR archive, all files that were previously included must also be included again. Otherwise the import will fail. The archive must therefore contain:
- Entities.xml
- propertyfile
- hashFile.json
Import into new firewall
It should also be mentioned that you must enter the storage master key of the old firewall for the import. Otherwise the import will fail.


Hi,
danke für das Tutorial. Hat mir bei der Migration sehr geholfen.
Gruß, Peter
Gerne 🙂